Setting up the Snowflake destination connector involves setting up Snowflake entities (warehouse, database, schema, user, and role) in the Snowflake console, setting up the data loading method (internal stage, AWS S3, or Google Cloud Storage bucket), and configuring the Snowflake destination connector using the Scispot UI.
This page describes the step-by-step process of setting up the Snowflake destination connector.
By default, Snowflake allows users to connect to the service from any computer or device IP address. A security administrator (i.e. users with the SECURITYADMIN role) or higher can create a network policy to allow or deny access to a single IP address or a list of addresses.
If you have any issues connecting with Scispot please make sure that the list of IP addresses is on the allowed list.
To determine whether a network policy is set on your account or for a specific user, execute the SHOW PARAMETERS command.
Account
SHOW PARAMETERS LIKE 'network_policy' IN ACCOUNT;
User
SHOW PARAMETERS LIKE 'network_policy' IN USER <username>;
To read more please check official Snowflake documentation.
To set up the Snowflake destination connector, you first need to create Scispot-specific Snowflake entities (a warehouse, database, schema, user, and role) with the OWNERSHIP permission to write data into Snowflake, track costs pertaining to Scispot, and control permissions at a granular level.
You can use the following script in a new Snowflake worksheet to create the entities:
Note: Make sure you follow the Snowflake identifier requirements while renaming the resources.
-- set variables (these need to be uppercase) set scispot_role = 'SCISPOT_ROLE'; set scispot_username = 'SCISPOT_USER'; set scispot_warehouse = 'SCISPOT_WAREHOUSE'; set scispot_database = 'SCISPOT_DATABASE'; set scispot_schema = 'SCISPOT_SCHEMA';
-- set user password set scispot_password = 'password';
begin;
-- create Scispot role use role securityadmin; create role if not exists identifier($scispot_role); grant role identifier($scispot_role) to role SYSADMIN;
-- create Scispot user create user if not exists identifier($scispot_username) password = $scispot_password default_role = $scispot_role default_warehouse = $scispot_warehouse;
grant role identifier($scispot_role) to user identifier($scispot_username);
-- change role to sysadmin for warehouse / database steps use role sysadmin;
-- create Scispot warehouse create warehouse if not exists identifier($scispot_warehouse) warehouse_size = xsmall warehouse_type = standard auto_suspend = 60 auto_resume = true initially_suspended = true;
-- create Scispot database create database if not exists identifier($scispot_database);
-- grant Scispot warehouse access grant USAGE on warehouse identifier($scispot_warehouse) to role identifier($scispot_role);
-- grant Scispot database access grant OWNERSHIP on database identifier($scispot_database) to role identifier($scispot_role);
commit;
begin;
USE DATABASE identifier($scispot_database);
-- create schema for Scispot data CREATE SCHEMA IF NOT EXISTS identifier($scispot_schema);
commit;
begin;
-- grant Scispot schema access grant OWNERSHIP on schema identifier($scispot_schema) to role identifier($scispot_role);
commit;
By default, Scispot uses Snowflake’s Internal Stage to load data. You can also load data using an Amazon S3 bucket, or Google Cloud Storage bucket.
Make sure the database and schema have the USAGE privilege.
Using an Amazon S3 bucket
To use an Amazon S3 bucket, create a new Amazon S3 bucket with read/write access for Scispot to stage data to Snowflake.
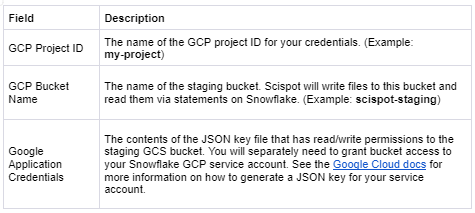
Using a Google Cloud Storage bucket
To use a Google Cloud Storage bucket:
create storage INTEGRATION gcs_scispot_integration TYPE = EXTERNAL_STAGE STORAGE_PROVIDER = GCS ENABLED = TRUE STORAGE_ALLOWED_LOCATIONS = ('gcs://YOURBUCKETNAME');
create stage gcs_scispot_stage url = 'gcs://YOURBUCKETNAME' storage_integration = gcs_scispot_integration;
GRANT USAGE ON integration gcs_scispot_integration TO ROLE SCISPOT_ROLE;
GRANT USAGE ON stage gcs_scispot_stage TO ROLE SCISPOT_ROLE;
DESC STORAGE INTEGRATION gcs_scispot_integration;
The final query should show a STORAGE_GCP_SERVICE_ACCOUNT property with an email as the property value. Add read/write permissions to your bucket with that email.
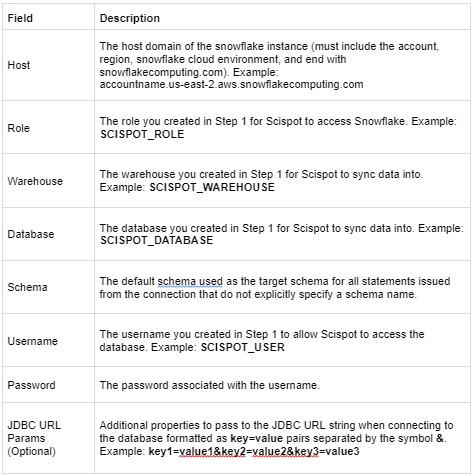
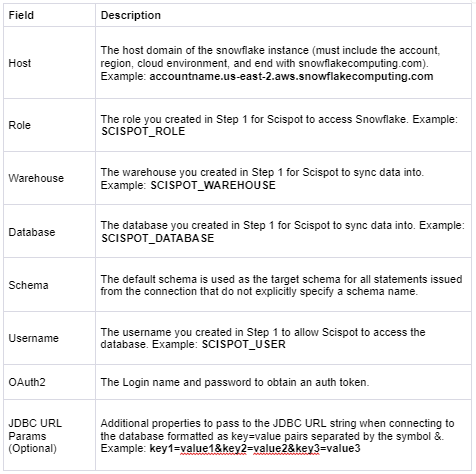
Navigate to the Scispot UI to set up Snowflake as a destination. You can authenticate using username/password or OAuth 2.0:
In order to configure key pair authentication you will need a private/public key pair.
If you do not have the key pair yet, you can generate one using openssl command line tool
Use this command in order to generate an unencrypted private key file:
`openssl genrsa 2048 | openssl pkcs8 -topk8 -inform PEM -out rsa_key.p8 -nocrypt`
Alternatively, use this command to generate an encrypted private key file:
`openssl genrsa 2048 | openssl pkcs8 -topk8 -inform PEM -v1 PBE-SHA1-RC4-128 -out rsa_key.p8`
Once you have your private key, you need to generate a matching public key.
You can do so with the following command:
`openssl rsa -in rsa_key.p8 -pubout -out rsa_key.pub`
Finally, you need to add the public key to your Snowflake user account.
You can do so with the following SQL command in Snowflake:
`alter user <user_name> set rsa_public_key=<public_key_value>;`
and replace <user_name> with your user name and <public_key_value> with your public key.
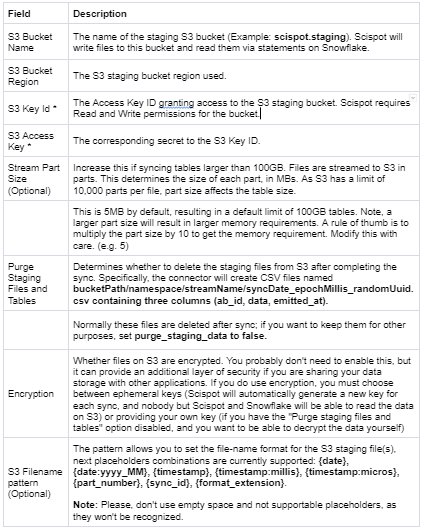
To use AWS S3 as the cloud storage, enter the information for the S3 bucket you created in Step 2:
To use a Google Cloud Storage bucket, enter the information for the bucket you created in Step 2: